French Strawberry Cake Fraisier – VIDEO RECIPE
French Strawberry Cake Fraisier is an amazingly delicious sponge cake filled with creamy custard buttercream and juicy strawberries.
My simple step-by-step recipe will guide you effortlessly through the process of creating this strawberry masterpiece.
It’s a heavenly treat that anyone can whip up with ease at home!
Indulge your loved ones with this stunningly tasty and beautiful strawberry delight!

Originating from France, this incredible strawberry cake derives its name from the French word “fraise,” meaning strawberry.
It’s a delightful celebration of this aromatic berry, resulting in a light and refreshing dessert.
The sponge cake is lovingly soaked in strawberry syrup.
While the custard is generously studded with pieces of this juicy berry.
To top it off, strawberry halves are artfully arranged with their cut sides facing outward.
And a crown of fresh berries adds the perfect finishing touch.

French Strawberry Cake Fraisier is an airy delight, that everybody falls in love with.
Just imagine, the sponge cake soaking up the irresistible strawberry syrup and the custard with the delightful strawberry halves.
The cake is then adorned with a thin layer of fondant and garnished with fresh berries.
Making a fondant (sugar mastic) at home is a breeze, using simple ingredients that result in a tender and incredibly tasty treat!

This classic French delicacy is a showstopper that graces the windows of countless pastry shops in France.
Especially charming is the encircling of the cake with strawberry halves, creating a stunning red ribbon effect.
You’ll fall head over heels for this cake at first sight, and the first bite will seal the deal!
So why wait? Indulge in the irresistible allure of this Cake Fraisier with strawberries and custard.
It’s a treat that will captivate your senses and leave you craving for more!
French Strawberry Cake Fraisier – VIDEO RECIPE

how to cook French Strawberry Cake Fraisier?
STEP 1

To start, preheat your oven to 180°C (350⁰F). Grab a large bowl and crack in some eggs. Add sugar and mix it all up with a mixer until it’s nice and smooth.
STEP 2

Now, take that bowl with the mixture and place it over a pan with simmering water. Keep beating it with the mixer for about 10 minutes until the volume of the egg mass triples in size. Once that’s done, take the bowl out and keep whisking the mixture until it cools down.
TIPS: Make sure you beat the egg mixture for the specified time. This is super important because it prevents the cake from falling off while it’s baking. Even if the volume of the mixture has already increased three times, keep on beating! Don’t rely on your gut feeling for timing, use an electronic or mechanical watch to keep track.
STEP 3

Grab a sieve and sift some flour into the egg mixture. Pour in some melted butter and gently mix it all together.
TIPS: Another piece of advice is to sift the flour before adding it to the egg mixture. This adds air to the mix and makes the cake super fluffy and airy. Trust me, you’ll love the texture!
TIPS: Instead of using butter, you can opt for good quality margarine. It works just as well!
TIPS: Melt your butter either on the stove or in the microwave – whichever is more convenient for you.
STEP 4

Next, grease a 22cm round springform cake pan with butter and line the bottom with parchment paper. Pour the dough into the pan and use a spatula to level the top.
TIPS: If you don’t have a springform pan, don’t worry! There are 4 alternative ways to replace it when baking.
STEP 5

Pop the pan with the dough into the preheated oven at 180°C (350⁰F) and let it bake for around 18-20 minutes until it turns a beautiful golden brown.
TIPS: Looking for some helpful advice on how to preheat your oven and prepare it for baking? Look no further than my articles “How and Why Do You Need to Preheat Oven” and “Top 7 Secrets How to Bake in Oven”.
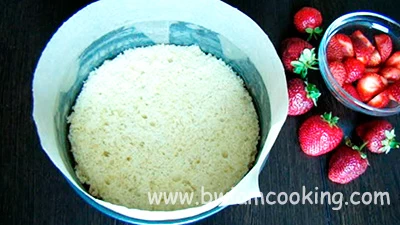
STEP 6

Once it’s done, leave the cake in the pan for about 5 minutes to make it easier to remove. After it’s cooled slightly, take the cake out of the pan, remove the parchment paper, and let it cool completely on a wire rack.
TIPS: Wondering if your cake layers are ready? Stick a wooden stick or toothpick into the center – if it comes out clean, yourcake layers are done.
STEP 7

Now, it’s time to cut the cooled cake into two parts lengthwise.
TIPS: You can easily cut the cake into layers. For this you can use a bread knife with a serrated blade, fishing line, or a knife specifically designed for cutting cakes.
STEP 8

Take each part and cut out a 20cm circle from them.
TIPS: Want to achieve a perfect circle of your cake layer? Grab a regular plate that matches the desired diameter. Then, simply cut out the circle using a sharp knife. Easy peasy!
STEP 9

Now, it’s time to make the tasty custard buttercream! Place the egg yolks in a bowl and add the sugar, starch, and flour. Make sure to stir thoroughly after each addition.
STEP 10

Next, pour the milk into a saucepan and put it on the fire to bring it to a boil. Take a third of the hot milk and pour it into the egg-flour mixture, stirring quickly. Then, pour this mixture back into the saucepan with the remaining milk and place it over medium heat. Keep stirring constantly until the mixture thickens.
STEP 11

Once the custard is ready, transfer it to a bowl and add 3 tablespoons of butter. Stir everything together.
STEP 12

To prevent a film from forming on the surface of the cream, cover the custard with cling film in contact and let it cool.
STEP 13

After the custard has cooled, place it in a medium bowl and beat it with a mixer. Add the remaining butter and continue mixing at low speed until the mixture becomes smooth. The amazing custard buttercream is ready!
STEP 14
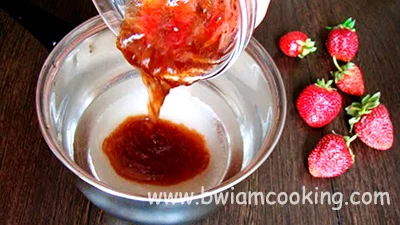
In a saucepan, pour water and add sugar. Then, mix in the strawberry jam and stir everything together. Bring the mixture to a boil and then remove it from the heat to let it cool.
STEP 15

Meanwhile, wash the strawberries, dry them, and remove the sepals. Cut some strawberries in half lengthwise and chop the larger berries into coarse pieces.
STEP 16
To assemble the cake, line the sides of a 20cm springform pan with silicone parchment paper. Place one sponge cake layer on the bottom and soak it in the strawberry syrup.
TIPS: When it comes to assembling the cake, you can get creative. Use a cake ring of needed diameter. Or opt for cake surrounding edge tape instead of silicone parchment paper. Both ways work like a miracle!
STEP 17

Spread some of the custard buttercream evenly on top of the soaked cake layer.
STEP 18

Place the strawberry halves along the edge of the sponge cake with the cut side facing the parchment paper.
STEP 19

Place coarsely chopped strawberries in the center of the cake layer down to the strawberry halves. Spread the custard buttercream on top, reserving some for the top of the cake.
STEP 20

Cover the cake with a second sponge cake layer and soak it in strawberry syrup.
STEP 21
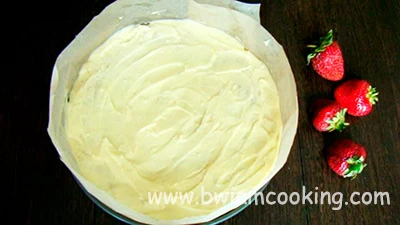
Apply the remaining buttercream on top and smooth it out well. Place in the refrigerator for 2 hours.
TIPS: When it comes to spreading the custard buttercream over the cake layers, using a pastry spatula will make your life much easier. It’s a handy tool that allows for a smooth and convenient application.
STEP 22

Roll out the fondant (sugar mastic) between two layers of cling film, cut out a 20cm circle. Cover the cooled cake with rolled out sugar mastic on top.
STEP 23

Decorate French Strawberry Cake Fraisier with strawberries, cut into equal pieces and serve with tea. Bon appetit!
TIPS: If you want to cut your chilled cake without any hassle, make sure to bring it to room temperature beforehand. This will make the cutting process a breeze.
French Strawberry Cake Fraisier
Ingredients:
for the sponge cake layers
- Eggs – 4 pcs. (200 g)
- Sugar – 1/2 cup (100 g)
- Flour – 3/4 cup (120 g)
- Melted butter – 2 tbsp. (28 g)
for the strawberry syrup
- Water – 1/2 cup (125 g)
- Sugar – 1/4 cup (50 g)
- Strawberry jam – 1/3 cup (100 g)
for the custard buttercream
- Milk – 1 1/5 cup (300 g)
- Egg yolks – 3 pcs. (60 g)
- Sugar – 1/4 cup (50 g)
- Flour – 2 tbsp. (18 g)
- Corn starch – 3 tbsp. (24 g)
- Softened butter – 1 cup (240 g)
for the assembly
- Strawberries – 1 1/2 containers (750 g)
- Fondant (sugar mastic) – 1 portion (150 g)
additionally
- Strawberry
Cooking steps:
Sponge cake layers
- Place eggs in a large bowl, add sugar, mix with a mixer until smooth. Put the bowl with the resulting mixture in a water bath (over a pan of simmering water). Beat with a mixer for 10 minutes until the volume of the egg mixture increases 3 times. Remove the bowl and continue whisking the mixture until it cools.
- Using a sieve, sift the flour into the egg mixture, pour in the melted butter, and mix gently.
- Grease a 22cm springform pan with butter and line the bottom with parchment paper. Place the resulting dough into the prepared pan. Level the top with a spatula.
- Bake in an oven preheated to 180°C (350⁰F) for about 18-20 minutes. Leave the finished sponge cake in the pan for 5 minutes. Once cooled slightly, remove the cake from the pan, remove the parchment paper and let cool completely on a wire rack.
- Cut the cooled sponge cake lengthwise into two layers. Cut out a 20 cm circle from each part of the sponge cake.
Custard buttercream
- Place egg yolks in a bowl, add sugar, add starch and flour, stirring thoroughly after each addition.
- Pour milk into a saucepan, put on fire, bring to a boil. Pour a third of the hot milk into the egg-flour mixture and stir quickly. Pour the resulting mixture back into the saucepan with the remaining milk and place over medium heat. Cook with constant stirring until the mixture thickens.
- Place the resulting custard in a bowl, add 3 tbsp. (42 g) butter, stir. Cover the finished custard with cling film in contact.
- Place the cooled custard in a medium bowl, beat with a mixer, add the remaining butter, mix with a mixer at low speed until smooth.
Strawberry syrup
- Pour water into a saucepan, add sugar, add strawberry jam, stir. Bring the resulting mixture to a boil, remove from heat and let cool.
Assembly
- Cut some strawberries in half lengthwise, large berries – chop coarsely.
- Line the side of a 20cm springform pan with silicone parchment paper. Place one sponge cake layer on the bottom and soak in strawberry syrup. Spread some of the custard buttercream evenly on top.
- Put the strawberry halves along the edge of the sponge cake layer with the cut side facing the parchment paper. Place coarsely chopped strawberries in the center of the sponge cake layer down to the strawberry halves. Spread the custard on top, reserving some for the top of the cake.
- Cover with a second sponge cake layer and soak in strawberry syrup. Apply the remaining custard buttercream on top and smooth it out well. Place in the refrigerator for 2 hours.
- Roll out the fondant between two sheets of cling film, cut out a 20cm circle. Cover the cooled cake with rolled out fondant on top.
- Decorate the finished sponge cake with strawberries.
Just the day before yesterday I baked this. I love this cake. It is beautiful and very tasty. And everyone at home loves it.
Glad you liked the recipe!